
Knotless braids have become increasingly popular in recent years, offering a low-maintenance and natural-looking option for those who desire a protective hairstyle. However, many people struggle with achieving a polished and elegant look when it comes to curling the ends of knotless braids. Whether you’re a seasoned braid-wearer or new to the trend, learning how to curl the ends of your knotless braids can add a touch of glamour and versatility to your everyday look.
In this article, we will delve into the step-by-step process of curling the ends of knotless braids, as well as provide tips and tricks to achieve the perfect curl every time. With the right tools and techniques, you can easily elevate your knotless braid hairstyle and embrace your inner goddess. So, let’s dive in and learn how to achieve beautiful, bouncy curls on your knotless braids.
There are many ways to curl the ends of knotless braids, and the best method for you will depend on your desired curl pattern, hair type, and level of experience. Here are 15 popular methods to try:
1.Using flexi rods:
To curl knotless braid ends with flexi rods, wrap small sections of the braids around the rods. Secure with hairpins if needed. Submerge the wrapped ends in hot water for a few seconds to set the curls. Allow them to air-dry or use a hooded dryer. This method ensures a defined and lasting curly finish without excessive heat.
2.Using curling irons:
Curl knotless braid ends using a small-barreled curling iron on low heat. Simply wrap individual sections of the braids around the iron, holding briefly to create curls. Exercise caution to avoid excessive heat, ensuring a stylish and controlled curling process.
3.Using braid clips:
To curl knotless braid ends with braid clips, section off small portions of the braids. Twist each section around the clip and leave it secured for some time. This method imparts a natural curl to the ends without heat. Ideal for those who prefer a heat-free option, braid clips help create stylish curls effortlessly.
4.Using Bantu knots:
To curl knotless braid ends with Bantu knots, divide the braids into small sections. Twist each section into a tight knot, securing with a hair tie. Leave the Bantu knots in overnight for natural curls, or use a hooded dryer for faster results. This heat-free method imparts a textured and curly finish to the ends of the knotless braids.

5.Using the hot water dip method:
To curl knotless braid ends using the hot water dip method, twist the desired sections of the braids and secure them. Dip the twisted ends into hot water for a few seconds, allowing the heat to set the curls. Carefully unravel the twists for a textured and defined curly look. This technique offers a simple and effective way to achieve curls without using heat styling tools.
6.Using braid spray:
To curl knotless braid ends with braid spray, dampen the ends with the spray. Divide the sections into small parts and twist them. Apply more braid spray for hold. Allow the twists to air-dry or use a hooded dryer. This method adds moisture and encourages natural curls, providing a simple and heat-free way to style knotless braids.
7.Using leave-in conditioner:
To curl knotless braid ends with leave-in conditioner, apply a small amount to the ends of the braids. Divide the sections into twists, then either air-dry or use a hooded dryer. The leave-in conditioner helps hydrate the hair, promoting a naturally textured and defined curl without the need for heat.
8.Braid the ends of the knotless braids
Braiding the ends of knotless braids is a simple method to create curls. Section the ends into small parts, then tightly braid each section. For natural curls, leave the braids overnight and unravel in the morning. This heat-free technique offers a classic and effective way to style the ends of knotless braids with a textured finish.
9.Twist the braid ends into finger coils
Prepare your hair for styling.
In order to achieve the best results when styling your hair, it is important to properly prepare your strands beforehand. Begin by thoroughly washing and conditioning your hair with products that are suitable for your hair type. This will help to remove any buildup or residue that can weigh down your hair and affect the end result. After washing, gently towel-dry your hair to remove excess water and avoid rough towel drying, as it can cause frizz and damage. Before applying any heat or styling products, it is essential to protect your hair from potential damage. Apply a heat protectant spray or serum to create a barrier between your hair and the styling tools, minimizing the risk of heat-induced damage. Additionally, applying a styling primer or leave-in conditioner can help to further protect and nourish your hair, ensuring a smooth and polished finish. By taking the time to properly prepare your hair for styling, you can achieve long-lasting and stunning results.

Use a high-quality heat protectant.
To ensure the health and integrity of your hair when curling the ends of knotless braids, it is crucial to use a high-quality heat protectant. A good heat protectant acts as a shield, preventing excessive heat from penetrating the hair shaft and causing damage. Look for a heat protectant that contains ingredients like silicone or argan oil, as they help to create a protective barrier and seal in moisture.
Before applying any heat styling tools, generously spray the heat protectant throughout your hair, focusing on the ends. This will not only safeguard your strands from heat damage but also add an extra layer of shine and smoothness. Remember, investing in a high-quality heat protectant is an essential step in maintaining the health and integrity of your hair while achieving beautifully curled ends for your knotless braids.
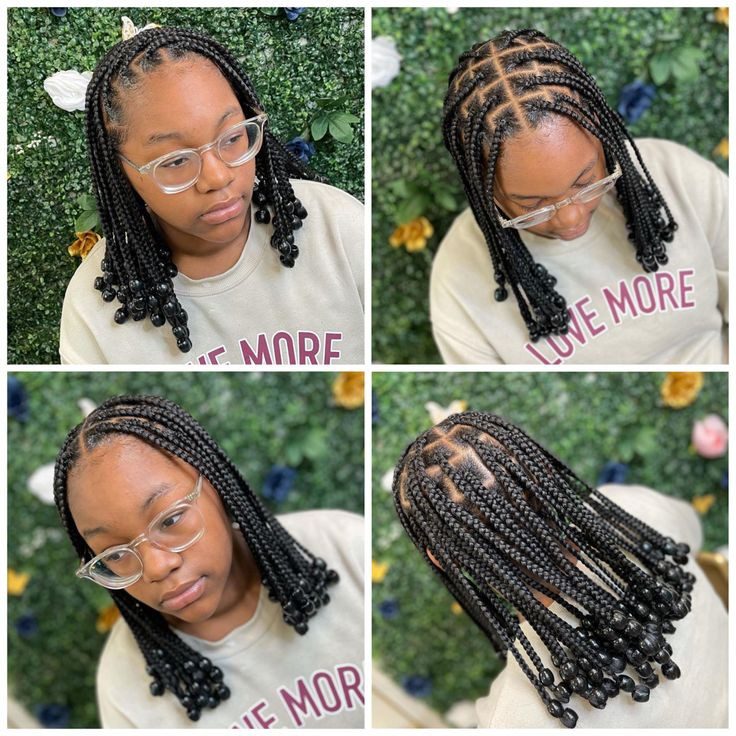
Section hair for clean application.
To achieve a clean and precise application when curling the ends of knotless braids, it is essential to section your hair properly. Sectioning your hair helps ensure that each braid receives equal heat and allows for a more uniform and polished result. Start by using a comb or your fingers to divide your hair into manageable sections.


Take small sections at a time, securing the rest of your hair out of the way with clips or hair ties. This not only makes the curling process more efficient but also prevents tangling and confusion. By sectioning your hair before curling, you can confidently work through each braid, knowing that you are giving it the attention it deserves, resulting in a flawless and beautifully curled finish.
Hold curling iron vertically.
When curling the ends of your knotless braids, it is important to hold the curling iron vertically for optimal results. Holding the curling iron vertically allows for better control over the curling process and helps create defined and lasting curls. By placing the curling iron vertically against the ends of the braids, you can wrap the hair around the barrel and hold it for a few seconds to set the curl.
This technique ensures that the curls blend seamlessly with the braids, creating a cohesive and polished look. Remember to be cautious while handling the hot curling iron and use heat protectant products to minimize damage to your hair.
Wrap ends around iron carefully.
To achieve the perfect curl on the ends of your knotless braids, it is essential to approach the wrapping process with utmost care. Gently take a small section of the hair from the end of the braid and wrap it around the curling iron barrel, making sure to hold the iron vertically for optimal control. Slowly and carefully wrap the hair around the barrel, ensuring that each section is wrapped neatly and evenly. Take care to avoid applying excessive pressure or holding the hair on the iron for too long, as this can lead to unwanted damage. By wrapping the ends around the iron carefully, you can achieve beautifully curled ends that enhance the overall look of your knotless braids.
Hold for 10-15 seconds.
The duration of time you hold the hair on the curling iron is crucial in achieving the desired curl for your knotless braids. It is recommended to hold the hair on the iron for a duration of 10-15 seconds. This allows the heat to penetrate the hair and create a lasting curl.
However, it is important to exercise caution and not exceed this time limit, as prolonged exposure to heat can damage the hair. By adhering to the suggested time frame, you can achieve beautiful, defined curls on the ends of your knotless braids without compromising the health and integrity of your hair.
Release and gently separate curls.
To release and gently separate curls, simply remove the curling iron from the hair and allow the curls to cool for a few seconds. This cooling process helps set the curl and make it last longer. Once the curls have cooled down, use your fingers or a wide-toothed comb to gently separate them.

Avoid using a brush as it can disrupt the curl pattern and lead to frizz. Start from the ends and work your way up, being careful not to tug or pull on the hair too harshly. This will help create more volume and give a natural, effortless look to your knotless braids. Remember to handle the curls gently to maintain their shape and prevent them from becoming frizzy.
Repeat on all braid ends.
After successfully curling one braid end, it’s important to repeat the process on all remaining braid ends to achieve a uniform and polished look. Take each braid individually and carefully wrap it around the curling iron, holding it in place for a few seconds.

Release the braid from the curling iron and allow it to cool briefly before moving onto the next braid. By consistently applying this technique to each braid end, you will ensure that all the ends are curled to perfection, enhancing the overall style of your knotless braids. Remember to exercise caution while handling the braids to avoid any unnecessary tugging or pulling, preserving the integrity of the curl and maintaining a seamless appearance throughout the hairstyle.
Use hairspray to set curls.
Once all the braid ends have been curled, it is essential to use hairspray to set the curls in place. Select a high-quality hairspray that offers a strong hold without leaving any residue. Hold the can approximately 12 inches away from your hair and lightly mist the curls, focusing on the ends.
This will ensure that the curls stay intact throughout the day and prevent them from unraveling. Allow the hairspray to dry completely before touching or styling your hair further. The hairspray will not only provide longevity to your curls but also add a glossy finish, giving your knotless braids a professional and polished look. By incorporating this step into your hairstyling routine, you can achieve long-lasting and beautifully defined curls that will make a statement.
Enjoy your beautifully curled braids.
Now that you have successfully curled the ends of your knotless braids, it’s time to enjoy the stunning results. Take a moment to admire the beautiful curls that add a touch of elegance and sophistication to your hairstyle. Whether you’re attending a special event or simply want to elevate your everyday look, these curls will undoubtedly make you feel confident and stylish.


Embrace your new hairstyle and flaunt your beautifully curled braids with pride. Remember to maintain your curls by protecting them while sleeping and avoiding excessive manipulation. With proper care, your curled knotless braids will continue to impress and make a lasting impression. Enjoy the versatility and beauty that comes with this curled braided hairstyle.
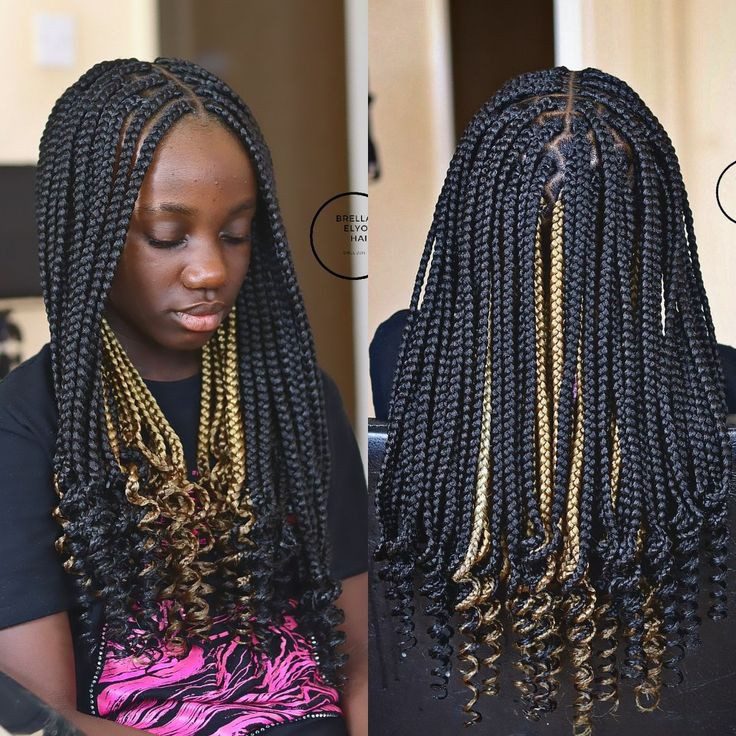
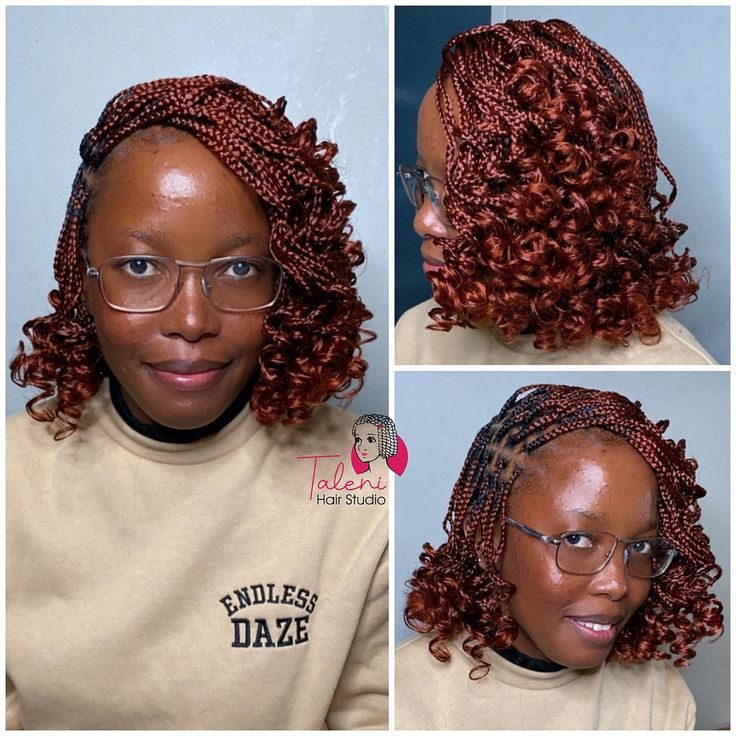
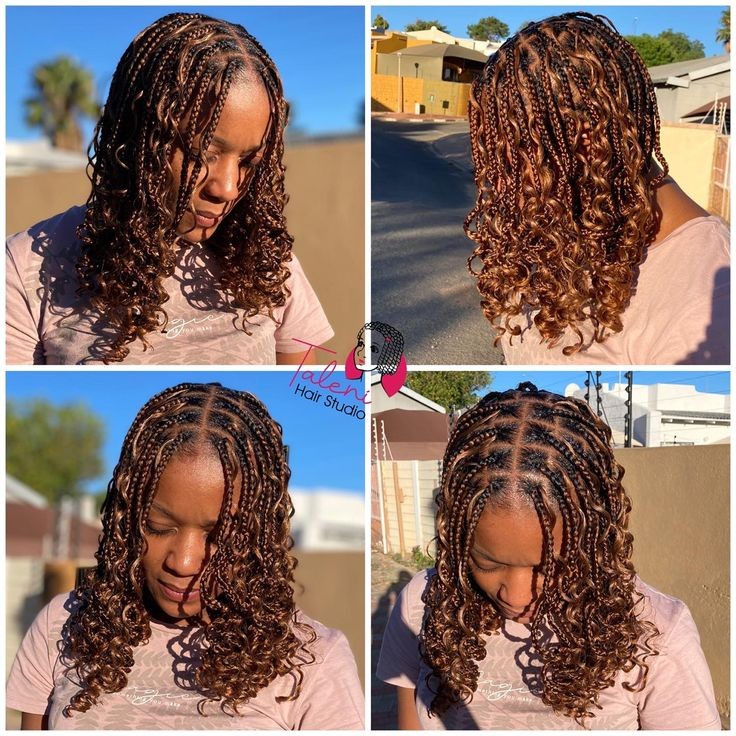
Medium Knotless Braids With Curls At The End
Medium knotless braids with curls at the end create a stylish and versatile look. To achieve this, consider using a small-barreled curling iron or the hot water dip method on the braided ends. Section off the braids and add curls for a trendy and textured appearance. This combination offers a chic and contemporary twist to the classic medium knotless braids.


With these techniques, you can easily achieve a beautiful and polished look for your knotless braids. Remember to always use a heat protectant and to be gentle with your hair to avoid damage. With practice and patience, you can master the art of curling the ends of your knotless braids and elevate your overall hairstyle. Whether you’re going for a casual look or a more elegant style, these tips will help you achieve the perfect curl every time. So go ahead and try it out, and don’t be afraid to experiment with different curling methods to find what works best for you. With these tips, you’ll be rocking gorgeous, curled knotless braids in no time.